The Perfect Maple Cookies

Two years ago we moved up to the Northeast, Upstate New York to be exact. I never saw myself living in upstate New York growing up, except maybe that one time I did a state report on New York and saw how pretty it was. But alas we ended up in Upstate New York and are loving it. Every place has traditions and one of the traditions in New York and Canada is Maple Syrup. Maple syrup is harvested in the late winter/early spring from maple trees. It is a super long process and one I was going to try to do until I saw how much goes into making the syrup. That is when I decided to buy the syrup instead. The syrup is pricey, but once I tried it for the first time I could not go back to imitation maple syrup.

When I bought my first jug of maple syrup I wanted to make sure it did not go to waste because I paid so much for it. I looked up recipes for maple everything, cookies and cakes. I made these maple cookies below and I was hooked. I made them for everything until I ran out of maple syrup. I had to patiently wait for maple harvesting season again and for the Coronavirus business restrictions to let up before I could get it. But once I got it I made my first batch of maple cookies and they were as good as I remembered. I hope you enjoy this recipe.
I have included some tricks and tips below to get amazing cookies.

Maple Cookies
Super Soft Delicious Flavorful Cookies
Author: Jennifer Crowther
Yield: 36
Prep Time: 15 Min Cook time: 12 Minutes 

INGREDIENTS:
  • 1 cup softened butter
  • 1 1/2 cup brown sugar
  • 1 egg (room temperature)
  • 1/3 cup Maple Syrup
  • 1 teaspoon vanilla
  • 3 cups flour
  • 2 teaspoons cornstarch
  • 1/2 teaspoon salt
  • 1/2 teaspoon baking soda
  • 1 teaspoon baking powder
  • granulated sugar
INSTRUCTIONS:
  1. Cream the butter and the sugar.
  2. Cream the egg with the butter mixture until fluffy.
  3. Add the maple syrup and the maple syrup to the mixture.
  4. Mix the dry ingredients, flour, cornstarch, slat, baking soda, and baking powder.
  5. Add the dry ingredients to the egg mixture.
  6. Combine the dry ingredients, flour, salt, baking soda, and cream of tarter.
  7. Chill in fridge for 30-60 minutes before baking.
  8. Form round balls and roll in granulated sugar.
  9. Bake at 375 degrees Fahrenheit for 10-12 minutes.
  10. Let cool and enjoy!
*One of the secrets to getting amazing cookies is to mix the butter and eggs until they are light and fluffy.

I used a disher to make my cookies into balls. That way they come out uniform in shape and size. I also use parchment paper so the cookies do not stick to the bottom of the pan.
Don't these look scrumptous?
Here is the finished product!


Read More »

How to Freeze Berries

When I lived in Oregon there were berry field super close by. The berries were super delicious and super cheap. One time I picked over 50 pounds of berries. What did I do with all those berries? I made jam and I also froze them. Frozen berries are perfect for smoothies, shakes, making jams and syrups later, adding to a recipe, toppings on ice cream etc. The possibilities are endless.  My son prefers frozen berries to fresh berries. There are some important tips to follow when freezing berries, they are not complicated, but can make life a lot easier when pulling berries out. The secret is freezing the berries individually so they do not stick to each other.
1. Wash the berries in the container they came in first. 
This step is super important. If the berries are not washed the dirt and everything else will freeze to it in the freezer.
2. Freeze or use the berries immediately after washing.
Berries ripen even faster when they are washed. I made the mistake of washing and storing berries. They get all mushy and do not taste very good.

3. Slice strawberries. There is no need to slice raspberries or blue berries because they are small. 
Raspberries and blueberries are super easy to eat the size they are. Strawberries however are hard to eat whole. I sliced mine up and they turned out super delicious.
4. Use wax or parchment paper to freeze the berries.
It is super important to put something under the berries so they will not stick to the cookie sheet or whatever is used to freeze them.

5. Space the berries out. 
Spacing the berries is the most important part and something I could have done better with the above strawberries. It enables individual berries to be pulled out/measured etc.

6. Flash freeze for 1-2 hours on a cookie sheet or over night.
Flash freezing is important because it again makes sure the berries are frozen before putting them in a bag. I sometimes forget and take the berries out the next day. They can sometimes be a little harder to get off the tray.

7. Take berries off the tray/Put berries in a bag and label the bag with the date.
Now the berries can be stored together and they will not freeze together! Save and enjoy the berries at a later date.


Read More »

The Best Snickerdoodles

Do you like Snickerdoodle cookies? We love them here at our house. They are the perfect blend of cinnamon and sugar with chewy cookie goodness. They are one of my sons and daughters favorite cookies. They make it all the time.


Here is the recipe, I hope you enjoy!

The Best Snickerdoodles
Super Soft Delicious Flavorful Cookies
Author: Jennifer Crowther
Yield: 36
Prep Time: 10 Min Cook time: 14 Minutes 

INGREDIENTS:
  • 1/2 cup softened butter
  • 1/2 cup sugar
  • 1/3 cup brown sugar
  • 1 egg
  • 1/2 teaspoon vanilla
  • 1 1/2 cups flour
  • 1/4 teaspoon salt
  • 1/2 teaspoon baking soda
  • 1/4 cream of tarter
  • 2 tablespoons sugar
  • 1 teaspoon cinnamon
INSTRUCTIONS:
  1. Take the butter and egg out of the fridge 1 hour before starting the cookie batter to bring to room temperature
  2. Make sure the butter is soft, cream the butter.
  3. Add the sugars and cream the mixture.
  4. Beat in the egg. Mix until fluffy.
  5. Add vanilla and mix.
  6. Combine the dry ingredients, flour, salt, baking soda, and cream of tarter.
  7. Add the dry ingredients to the wet mixture and mix until they are mixed in.
  8. Store in fridge for 30-60 minutes before baking.
  9. Bake at 300 degrees Fahrenheit for 12-14 minutes. Remove before they appear golden brown, they will be overbaked at that time.

Read More »

Watkins Original Gourmet Baking Supplies Review

Recently Watkins contacted and sponsored me to review their baking supplies. I jumped at the opportunity. I love baking and trying new things.

Watkins has been around since 1868 and have a headquarters in Minnesota. They make a variety of products; extracts, spices, food coloring, soaps, lotions, cleaners, pain relief, and body scrubs. I had never heard of them before, but the more I have learned, the more I love this company. I love that their products are pure and high quality. I am always on the lookout for good baking products.

I received the following in my box; baking vanilla, pure lemon extract, pure almond extract, pure coffee extract, pure ground cinnamon, and food coloring. I was especially excited about the food coloring because it does not have dyes in it. I have been trying to avoid food dyes with my kids.


The first thing I decided to try was the vanilla. It came in an 11 ounce bottle. I decided to make some chocolate chip cookies.


I used the King Arthur Flour Chocolate Chip Oatmeal recipe for the chocolate chip cookies. The turned out fantastic. I even had someone comment to me they could taste something different in the cookies and asked if I had used something special. I told them I used Watkins vanilla.


Next up I made almond cinnamon cupcakes with an almond cinnamon buttercream frosting that tasted amazing!


Here is the finished product and they tasted as amazing as they look here. I will definitely be making these again. I took them to a function and someone had two at the event and wanted to take more home with her.


 The last thing I tried was the lemon extract, the food coloring and the vanilla again. I made lemon sugar cookies with a lemon buttercream frosting.


The lemon cookies turned out delicious and the frosting colors were amazing! The red was a little pink, but that is typical with red food coloring. I would probably just have to put in more dye to make it darker. I will definitely be using this dye in the future because it was so good and I like that all the ingredients in the dye were natural and not artificial. I let my kids frost the rest of the cookies and they had a lot of fun.


All in all what did I think of Watkins baking products? I LOVED all of them and will be using all of them again. My kids kept begging for all the treats we made this week. I have not really cooked with almond and lemon extract and was excited to go out of my comfort zone and try something new. I would definitely recommend picking up some of these products for baking.


Read More »

Lemon Sugar Cookies with Lemon Buttercream Frosting

Do you want to make some really good lemon sugar cookies with lemon frosting? These are a soft sugar cookie with a delicious buttercream frosting with a hint of lemon. I like that the lemon is not overpowering in this cookie. I have the recipe for you. I decided to dye mine too to make them really fun for my kiddos.


Adapted from https://butterwithasideofbread.com/lemon-sugar-cookies/

Lemon Sugar Cookies with Lemon Buttercream Frosting
Soft Cookies with a Hint of Tang
Author: Jennifer Crowther
Yield: 24
Prep Time: 15 Min Cook time: 12 Minutes 

INGREDIENTS FOR LEMON SUGAR COOKIES:
  • 1/2 cup softened butter
  • 1 cup sugar
  • 1 egg
  • 1 tsp Watkins vanilla extract
  • 1/3 cup sour cream
  • 1/2 tsp Watkins lemon extract
  • 1 Tbsp lemon zest
  • 1/2 tsp salt
  • 1/2 tsp baking soda
  • 2 cups all-purpose flour
INGREDIENTS FOR LEMON BUTTER CREAM FROSTING:
  • 1/2 cup softened butter
  • 1 tsp vanilla
  • 2 Tbsp milk
  • 1/2 tsp Watkins lemon extract
  • 1 Tbsp lemon zest
  • 4 cups powdered sugar
INSTRUCTIONS FOR LEMON SUGAR COOKIES:
  1. Preheat the oven to 375 degrees. Line the cookie sheet with parchment paper.
  2. Cream the butter for 1-2 minutes.
  3. Add the sugar and cream.
  4. Add the egg and cream.
  5. Add the vanilla, sour cream, and cream
  6. Add the lemon extract and lemon zest and mix.
  7. Combine the salt, baking soda, and flour.
  8. Fix in the flour mixture.
  9. Use a disher to make rounded balls.
  10. Bake for 10 minutes.
INSTRUCTIONS FOR LEMON SUGAR COOKIES:
  • Cream the butter.
  • Add the vanilla and milk and cream.
  • Add the lemon extract and zest and cream.
  • Add the powdered sugar 1 cup at a time and mix until the frosting is the right consistency. May need to add a little more or less than 4 cups of sugar.
I hope you enjoy the cookies!


Read More »

Almond Cinnamon Cupcakes with Almond Cinnamon Butter Frosting

Do you want to make some AMAZING almond cinnamon cupcakes? I have the recipe for you. I recently made these and they were delicious.


Adapted from the recipe, https://www.lifeloveandsugar.com/2014/10/08/cinnamon-sugar-almond-cupcakes/

ALMOND CINNAMON CUPCAKES
Author: Jennifer Crowther
Yield: 25
Prep Time: 10 Min Cook time: 25 Minutes 

INGREDIENTS FOR CUPCAKES:
  • 3/4 cup butter
  • 1 cup sugar
  • 3 egg whites
  • 1/2 cup sour cream
  • 1/2 cup milk
  • 3 tsp Watkins almond extract
  • 1 2/3 cups all purpose flour
  • 1/4 tsp baking soda
  • 1 tsp baking powder
  • 1 1/2 tsp cinnamon
INGREDIENTS FOR CINNAMON BUTTERCREAM FROSTING:
  • 1 cup butter
  • 4 cups powdered sugar
  • 2 1/4 tsp cinnamon
  • 1/2 tsp almond extract
  • 2-3 Tbs milk
INSTRUCTIONS FOR CUPCAKES:
  1. Preheat oven to 350 degrees. Put cupcake wrappers in cupcake baking apparatus.
  2. Cream the butter for 2 minutes.
  3. Add the sugar and continue to cream.
  4. Add the eggs and beat for 2-3 minutes.
  5. Add and mix the sour cream.
  6. Combine the milk and the almond extract.
  7. Sift the flour with the baking soda, baking powder, and cinnamon.
  8. Alternate add the wet and milk mixture and flour mixture to the butter mixture.
  9. Fill the cupcake liners with a 20 disher.
  10. Bake 20-25 minutes or until cupcakes spring back to the touch.
  11. Let cool and frost.
  12. Sprinkle with cinnamon.
INSTRUCTIONS FOR CINNAMON BUTTERCREAM FROSTING:
  1. Cream the butter.
  2. Add the milk and almond extract and mix.
  3. Mix in the cinnamon.
  4. Add the powdered sugar 1 cup at a time and mix until the frosting is the right consistency. May need to add a little more or less than 4 cups of sugar.
I hope you enjoy the cupcakes as much as I did!

Read More »

Beef Stroganoff: Easy and Delicious Slow Cook Recipe

When I was in college I feel in love with this Beef Stroganoff recipe. We had roommate dinners in college, where one roommate would cook dinner for all the rest of the roommates one night a week. When we got home from school dinner was always there. My roommate made this Beef Stroganoff and every so often I would ask her to make it for us because I loved it so much. When we parted ways I made sure to grab the recipe and now I so excited to share it!


This recipe is super easy. Throw the ingredients in the slow cooker, boil the noodles and done!

I like to either grab any kind of beef for this meal. I have made it with several different cuts; stewing beef (pictured here), steak, and a roast. If I use a steak or a roast I throw in the whole thing and then cut the meat right before I serve it. I bought the mushrooms pre-cut to make it that much faster. The only thing I had to really prep was the onions and that was super fast.

BEEF STROGANOFF
Author: Jennifer Crowther
Yield: 12
Prep Time: 15 Min Cook time: 8 Hours

INGREDIENTS:
  • 1 onion, diced
  • 5 to 10 fresh mushrooms, sliced
  • 1 slab round steak, cut into pieces (stewing beef makes it easy)
  • 2 to 3 Tablespoons Worcester sauce
  • 4 cans cream of mushroom soup
  • 1/4 cup ketchup
  • garlic
  • 1/4 to 1/2 cup sour cream or cream cheese
INSTRUCTIONS:
  1. Add all ingredients to a crockpot, except cream.
  2. Mix together and let cook on high 4 hours or low 8 hours.
  3. Add cream just before serving.
  4. Serve on rice or egg noodles.
Here is the finished product, yummy goodness.


I hope you enjoy this recipe as much I do. I brought it to a church function last night where there 20 other crock pot soups and it was almost gone when we left. (Some other soups were still full.) There is just enough for one more serving. Everyone really loved it. I think you will too!


I am sharing this recipe as part of Slow Cooker Spooctacular event hosted by Simple Simon and Company. Check out their tips, other posts and a giveaway to win your own slow cooker. 

Read More »

Easy DIY Fruit Bouquet

Have you ever seen a fruit bouquet? I think they are genius. Not only are they beautiful, but they are delicious to eat, and they are healthy! That is three wins.

Earlier this year I made this fruit bouquet for a friend. These can be made for any occasion, birthdays, holidays, thinking of you etc. And they are not that hard to make, the pineapples and melting the chocolate took the longest time. And that was not long at all.

Supplies for a fruit bouquet
  1. Fruit- I used pineapple, green and red grapes, and strawberries.
  2. Cookie cutter
  3. Skewers-I got these at my local grocery store meat department.
  4. Vase
  5. Tissue paper
  6. Foam or pool noodle to go inside
  7. Bow
  8. Simple syrup (water and sugar)
  9. Pastry brush
  10. Cookie sheet-can line with wax paper
Steps to Make a Fruit Bouquet
  1. Prepare the vase by putting the tissue paper in first, then put in the foam. Tie the bow around the vase.
  2. Wash all the fruit.
  3. Make a simple syrup, heat 1 part water with 1 part sugar until sugar is melted.
  4. Melt and temper chocolate using the double broiler method. Ie place a pan of water on the stove. On top of that place a heat resistant bowl. Heat water to a low boil or just below boiling. Melt chocolate in the bowl.
  5. Cut pineapple open. Slice in rectangles. Use the cookie cutter on the slices to make heart shapes or whatever shape is desired.
  6. Dip the strawberries in the chocolate. I did half and half to create a color differential on the arrangement.
  7. Place all fruit on the cookie sheet. Brush with the simple syrup. Let dry for a few minutes
  8. Place all the fruit on the skewers. This will be a little sticky depending on how dry the fruit is. The pineapples are the most tricky. They are slimy and like to fall off.
  9. Stick the skewers in the foam and arrange the fruit randomly.
That is all the steps to make the perfect Fruit Bouquet. Whoever gets it will love it! Let me know if you make one. I would love to see it.


Read More »

Magnolia Bakery Devil's Food Cake with the Best Chocolate Frosting

I do not know if you have noticed, but baking is one of my favorite things to do. I made this cake for my husband's birthday a couple weekends ago. This amazing Devil's Food cake is from the Magnolia Bakery cookbook. I love making cakes and desserts from that book. This cake is super delicious and the frosting is TO DIE FOR. Next time I make this I think I will only do half or third it instead though because it makes a lot.


Magnolia Cupcakes Devil's Food Cake with the Best Chocolate Frosting
Author: Jennifer Crowther
Yield: 36
Prep Time: 30 Min Cook time: 30 Min

INGREDIENTS FOR DEVIL'S FOOD CAKE:
  • 1 1⁄2 (3 sticks) cups unsalted butter, softened
  • 2 cups light brown sugar
  • 3 large eggs (room temperature, separated)
  • 8 ounces unsweetened chocolate, melted
  • 2 cups milk
  • 1 1⁄2 teaspoons vanilla
  • 2 1⁄2 to 2 3⁄4 cups flour
  • 1 1⁄2 teaspoons baking powder
  • 1 1⁄2 teaspoons baking soda
  • 1⁄4 teaspoon salt
INGREDIENTS FOR BUTTERCREAM ICING:
  • 1 1⁄2 cups unsalted butter
  • 2 Tablespoons milk
  • 9 ounces semisweet chocolate, melted
  • 1 teaspoon vanilla extract
  • 2 1/4 cup powered sugar
INSTRUCTIONS FOR DEVIL'S FOOD CAKE:
  1. Grease the pans, add wax paper to bottom. Preheat the oven to 350 F.
  2. Separate eggs before they come to room temperature. Leave milk, butter and eggs out for an hour to come to room temperature.
  3. Sift together the dry ingredients, flour, baking powder, baking soda and salt.
  4. Combine the milk and vanilla.
  5. Using the double boiler method, melt the chocolate. This involves placing a pan of water on the stove and then a heat resistant bowl on top. Place the chocolate in the bowl, stir until melted. IMPORTANT-Do no let any water get in the bowl or the chocolate will seize. Let cool.
  6. Whip butter for 2 minutes in a mixer.
  7. Add sugar and beat for additional 3 minutes or until creamed.
  8. Beat the egg yolks until yellow, add to mixture beating until thoroughly mixed.
  9. Add the cooled chocolate, mix well.
  10. Alternate between adding the milk mixture and the dry mixture 3 times.
  11. Whip the egg whites until fluffy.
  12. Fold in egg whites.
  13. Put batter in pan(s). Bake for 30 to 40 minutes or until the cake is springy to the touch.
  14. Let cool for 10 minutes in pan on wire racks.
  15. Remove from pans and let it continue to cool
  16. Ice the cake.
INSTRUCTIONS FOR DEVIL'S FOOD CAKE:
  1. Leave the butter, and milk out for at least an hour before making the frosting.
  2. Melt the chocolate using a double broiler method. Boil some water over the counter, place a heat resistant bowl on top. IMPORTANT-Do no let any water get in the bowl or the chocolate will seize.
  3. Let the chocolate cool for 15 minutes.
  4. Beat the butter for 3 minutes, incorporating lots of air.
  5. Add the milk and mix well.
  6. Add the chocolate and beat for 2 minutes.
  7. Add the vanilla extract and beat for 3 minutes.
  8. Add the sugar gradually, beating on low. You may need more, you may need less depending on your desired frosting consistency and temperature of the butter.
  9. Spread on your cupcakes and enjoy!
*I use a Wilton straight spatula

*Sprinkles add a very nice touch

*If you do not have time to let the butter cool down, cut the butter into slices and leave on a plate for 5 minutes. Put the milk in a wide bowl.


Read More »

Homemade S'more Cake and Churro S'mores SoBakeable Review


Have you ever had a really good S'more? You know the kind where the chocolate and the marshmallow is melted? We were on vacation in Utah a few weeks ago and had S'mores, but by the time the marshmallow got in the graham cracker, the marshmallow was cold and the chocolate hard. That reminded me why I generally do not eat S'mores. Not that I do not love the ingredients, I do not like the hardness of it all. Well today I just tasted the best S'more I have ever eaten and I want to eat some more. Notice the pun. :) And want to know why? Everything was perfectly melted, the way a S'more should be!

This very yummy post was sponsored by SoBakeable. (I love doing posts like these btw, ones where I get to eat yummy baked items)
What is SoBakeable?
I am so excited to share with you today my review of SoBakeable. They are a San Francisco based company founded by Chloe, who is from Australia and Jocelyn, who is from South Africa. They both moved to the US when their husbands started working here. They spend a lot of time together and really enjoy baking. They decided to start SoBakeable so others could eat the yummy things they made too. They focus on dessert items.

What do They Make?
SoBakeable has kits available on their website for different baked goods. The kits are for beginning to advanced bakers. They even have an app to download for videos and instructions on making their baked goods. Right now their offerings are; S'more Kits, Cookie Cups, Salted Caramel Brownies, Chocolate Lover, Crazy About Coolies, Fresh & Fruity, Fancy Celebration, Vanilla Cupcakes, Sprinkles and Baking Tools. They range in prices from 19.95 to 49.95.

I received the S'mores kit and I can tell you it was delish. The S'mores kit came with instructions for S'more Cake and Churro S'mores.

What's In the Kit?
Each kit comes with all the dry ingredients packaged nicely, a list of wet ingredients to buy, and instructions on how to make the dessert. Here's what came in my kit.

The S'more Cake Kit  came with chocolate chips, sugar, cake mix, crumbs, and meringue mix.
The Churro S'mores Kit came with delicious Smash Mallow Cinnamon Churro, Graham Crackers, and Chocolate Chips.
Baking
I was not too nervous to make the Churro S'mores. They looked pretty easy, melt the chocolate and warm the marshmallows. I was however nervous to make the S'more Cake. I kept putting if off scared I would mess it up. I have never made homemade marshmallow and I was super nervous about browning the top. I thought I would burn it. I decided to finally be brave and went to work. And am so glad I did.

I love to get all the ingredients and tools together before I start so I do not have to look for anything while I am cooking. I love my Breville mixer because it has a scraping mixer attachment so I do not have to scrape the sides.

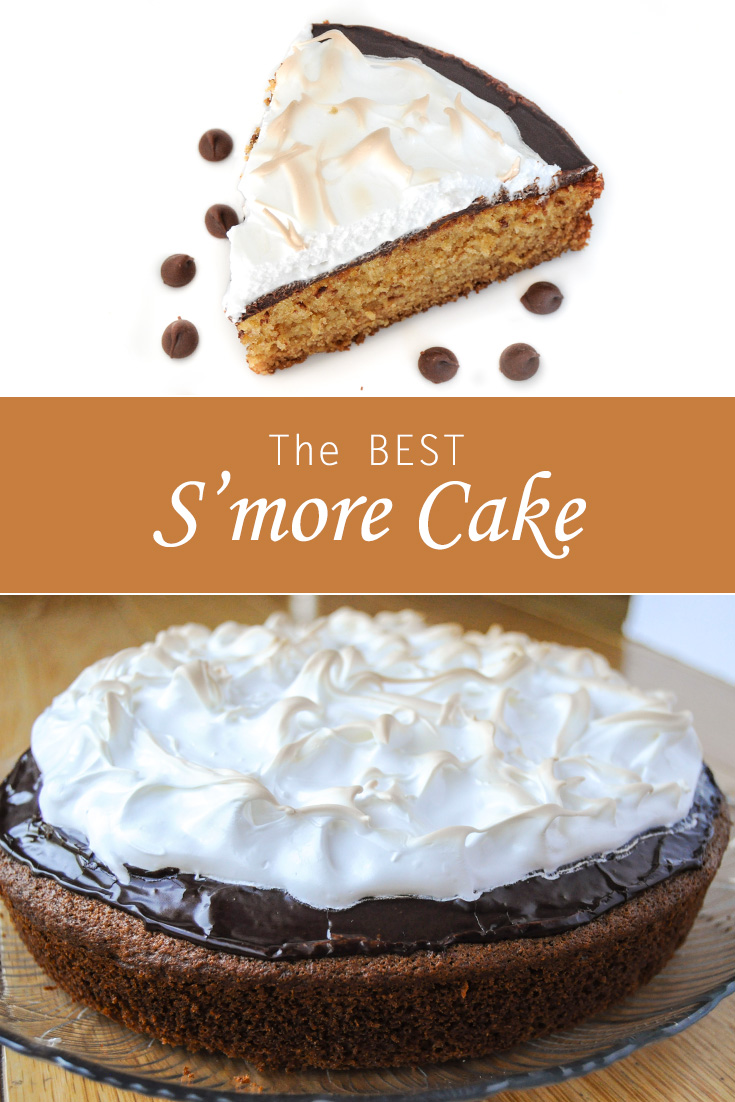
Here's the finished cake. They even included a liner for the bottom for easy removal. They said to test the cake by toothpick. I did that, but I also like to feel the firmness of the cake. When it is springy everywhere, ie it pushes back up when you press it, it is done.

They had me make a ganache and melt the chocolate in the microwave. I usually use the double boiler method, but the microwave was super easy. I used a Wilton wand to spread the chocolate just like the instructions said.

Here I am starting the homemade marshmallow, so far so good.

And guess what? It turned out! I really surprised myself.  To get the little ridges I spread out the marshmallow and then dipped and raised wherever I wanted a ridge. I could have left it in a little longer, but I was nervous about burning the top. It was hard to tell if it was golden brown in the oven.

And here are the S'mores. They turned out amazing as well.

What did I think?
The food was delicious. The cake was to die for! The sponge was fluffy, the topping was sweet, but not too sweet and the chocolate added a nice layer in between. The S'more was so good. The marshmallows they use for the middle are covered in cinnamon and sugar. Yum!

I was super surprised how well I did. Their instructions helped me develop some more baking skills I did not even know I had. I made homemade marshmallow for goodness sake. I loved that the ingredients were premeasured so I did not have to measure anything. I just opened the bag and threw things in. The cake was super easy to make. I probably made the batter in 6 minutes using my mixer. The only thing I would change is to have more graham crackers. I only got enough for crackers to make three S'mores, but I definitely have enough chocolate and marshmallows to make 14. I will go buy some more graham crackers to finish the S'mores, because they were delicious. Other than that it was an amazing experience baking. I loved everything I made and surprised myself. Hurry to sobakeable.com, enter BAKINGFUN to save $5 dollars, and get baking! You will not regret it.


Read More »